Self Host Prefect With ECS Work Pool Using Pulumi
In a recent project I was tasked with automating a python workflow on AWS. The workflow was supposed to run once a week but it consumed over 30 GB of memory which is quite a lot. Running a server 24/7 for an infrequent task is already wasteful but to provision a large one, as was required in this case, would’ve been even worse. So we were looking at how we could use Fargate here to dynamically provision the infrastructure. Luckily the team was already using Prefect in their local machines and since it provides a good integration with Fargate, we decided to self host it.
This was a rather new experience for me and while I was able to find most of the information in the docs, I felt a detailed guide covering some of the little nuances would be useful for someone just getting started.
We will be using Pulumi, an IaC framework, to manage the infrastructure on AWS. While not necessary in order to follow this guide, familiarity with Pulumi or a similar framework like Terraform or CDK would be helpful in understanding the infrastructure code.
Full code is hosted on github
Flow
The most fundamental object of Prefect is Flow which is essentially a decorator over a python function that helps Prefect manage its lifecycle. A flow may contain invocations to other flows (referred to as subflows) or Tasks.
For this guide we’ll write a simple flow that calculates mean and median of an integer array and prints the outputs.
First we’ll create a new directory and in it a virtual env
python -m venv venv

# Windows
venv/Scripts/Activate

# Mac / Linux
source venv/bin/activate
Then we create a requirements.txt with the content:
prefect==2.20.0
And run pip install
pip install -r requirements.txt
And finally we write the flow in main.py
import statistics
from typing import List
from prefect import flow, task


@task
def calculate_mean(nums: List[int]):
    return statistics.mean(nums)


@task
def calculate_median(nums: List[int]):
    return statistics.median(nums)


@flow(log_prints=True)
def mean_and_median():
    nums = [5, 2, 2, 3, 5, 4]

    mean = calculate_mean(nums=nums)
    median = calculate_median(nums=nums)

    print(mean, median)


if __name__ == "__main__":
    mean_and_median()
Notice the @flow decorator on the entrypoint function and @task on the functions called inside it.
Before we can run this though we need to start the server on our machine. The Prefect package that we installed includes the server that comes with a pretty useful UI allowing us to configure and view the flows and a whole bunch of other things which we’ll touch upon later in the guide. Most, if not all, of the configuration can be done programmatically as well but I find the UI very useful especially for viewing the flow runs and its logs.
Start the server with the following command which will launch it at http://127.0.0.1:4200
prefect server start
And finally we can run the flow now!
python main.py
NOTE: Although it shouldn’t happen for first timers but if you get an error related to server address make sure you’ve set the config to point to the local server.
prefect config set PREFECT_API_URL="http://127.0.0.1:4200/api"
If the run is successful, you’ll see similar logs in the terminal. You can also view it in the UI by navigating to the Flow Runs tabs.
19:08:24.767 | INFO    | prefect.engine - Created flow run 'khaki-bittern' for flow 'mean-and-median'
19:08:24.769 | INFO    | Flow run 'khaki-bittern' - View at http://127.0.0.1:4200/flow-runs/flow-run/145e0101-ea87-4c38-81f5-26fb9d41db45
19:08:24.818 | INFO    | Flow run 'khaki-bittern' - Created task run 'calculate_mean-0' for task 'calculate_mean'
19:08:24.819 | INFO    | Flow run 'khaki-bittern' - Executing 'calculate_mean-0' immediately...
19:08:25.026 | INFO    | Task run 'calculate_mean-0' - Finished in state Completed()
19:08:25.044 | INFO    | Flow run 'khaki-bittern' - Created task run 'calculate_median-0' for task 'calculate_median'
19:08:25.045 | INFO    | Flow run 'khaki-bittern' - Executing 'calculate_median-0' immediately...
19:08:25.093 | INFO    | Task run 'calculate_median-0' - Finished in state Completed()
19:08:25.094 | INFO    | Flow run 'khaki-bittern' - 3.5 3.5
19:08:25.117 | INFO    | Flow run 'khaki-bittern' - Finished in state Completed('All states completed.')
Deploy in local server
We manually trigerred the flow from command line which is not very different from running a regular python script. We’d also like to delegate the invocation part to Prefect and schedule the runs and we can do that by creating a deployment.
It’s very simple to do so. We just have to update our main block to the following and it’ll create a deployment in our local server running the flow every minute.
if __name__ == "__main__":
    mean_and_median.serve(name="deployment", cron="* * * * *")
While the server is up, simply run in the terminal
python main.py
This’ll create an active session in your terminal listening for scheduled runs so it must remain active. Check the Deployment tab in the UI to see if an entry was made. After a minute passes, observe the logs in your terminal or the UI, the flow should’ve automatically run.
Dynamically provision infrastructure
If we had a very simple flow similar to the one we’ve written then perhaps the above way of deploying would be sufficient and could be set up in a small EC2 instance. The scenario we’re assuming, however, is that of a flow that’s very resource intensive but runs infrequently. So we want to dynamically provision the infrastructure in order to save costs.
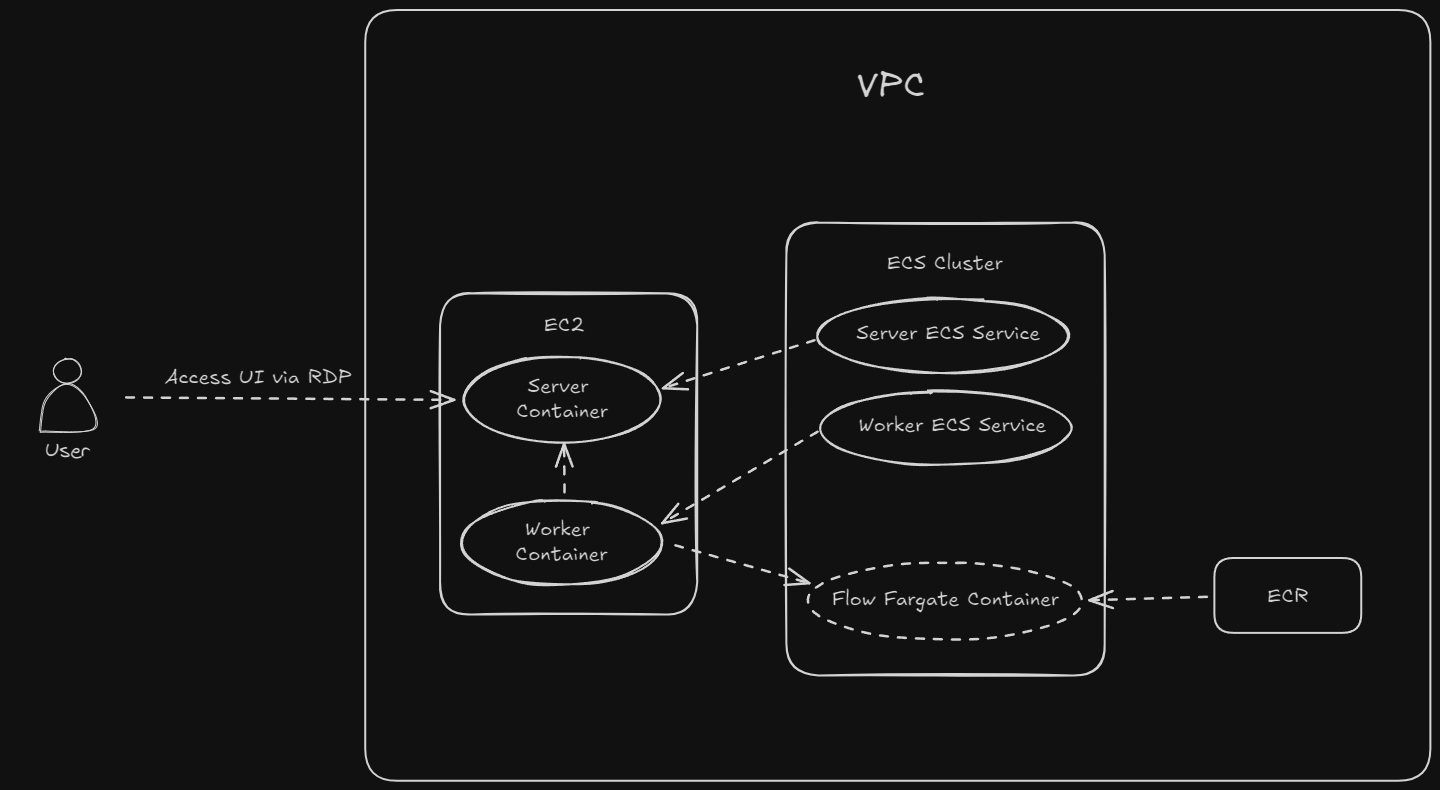
This is achieved by Work pools and Workers. In this design, a worker process polls the server for scheduled runs of a deployment and starts a Fargate container for executing the flow accordingly. The container is automatically deprovisioned on completion of the execution.
If we were using Prefect cloud, we could’ve just defined a work pool and let them manage the workers. But in cases where data privacy and security is of utmost importance, it may be useful to manage the workers ourselves. Note even in that case we can continue to use Prefect cloud which will essentially behave as the server only and comes with the benefit of built-in authentication which unfortunately is not available in the community version of the server. Since we’re self hosting the server too and there’s no authentication module, we’ll block all public access - allowing incoming SSH/RDP to select IPs whenever it’s required to connect to the server.
Going back to the architecture diagram, note that we’ll be hosting the server and worker processes as ECS services deployed in a small EC2 instance. This makes it easier to manage the environment variables and run version updates without connecting to the EC2 instance. Another interesting thing to note is the that flow’s image is retrieved from ECR. We will be updating the deploy function in our flow script so that it creates a docker image and uploads to ECR.
A couple more things about the architecture that are worth noting:
- We’re setting up a desktop environment
xfcein the ec2 instance so that we can access it via RDP and browse the server UI. I followed Digital Ocean’s guide to write the bash script in pulumi that sets it up. - There’s no external database. While Prefect supports Postgres, it defaults to using sqlite if a connection string isn’t specified in the env. The docs recommend using Postgres in production but depending on your processing needs and how important the data is to you - since it mostly consists of logs and some config - it might be ok to use sqlite.
For brevity I have omitted the Pulumi code in this article but it can of course be found in the repository along with some details in the Readme and helpful comments in code. For instructions to run it I’d recommend going through Pulumi’s get started guide. Once the infrastructure is up, we can move on to setting things up in order to deploy our flow to the self hosted server.
RDP user
We need a non-sudo user that has password authentication enabled to connect with the EC2 instance via RDP. Let’s connect to the instance using the default user that AWS creates, in my case ubuntu via SSH (make sure to allow your ip in the inbound rules of the security group). Once in, run the following to create a user named prefect and restart the xrdp service.
sudo adduser --home /home/prefect/ prefect
sudo service xrdp restart
Upon running you’ll be required to set a password.
Now we can connect to the instance using a RDP client. I’m using Windows so Microsoft’s RDP client works well for me however some of my colleagues with M chip Mac experience severe lag with it so depending on your system you may choose a different client.
In the local machine let’s open a tunnel for the RDP port (3389) so that we don’t have to add another inbound rule in the security group.
ssh -i <pem_file> -N -L 3390:<host>:3389 ubuntu@<host>
From the client let’s connect to localhost:3390 and enter password. In the remote desktop, open terminal and enter firefox to open up the browser and navigate to http://localhost. We have successfully hosted and connected to Prefect!
Work pool config
Notice a Work Pool by the name mean_and_median has been created. This was done automatically by the the worker process. From the UI we’ll configure a few things in it; click on the 3 dots icon, select edit and update the following:
- Set Environment Variables. We’ll only set the server url.
{"PREFECT_API_URL":"http://<ec2-private-ip>/api"}
- Create an AWS credential, setting only the region. Access key and secret should not be set as we’ll be assiging a role to the task.
- Set Cluster Name. We’ll set it to
prefect-work-pool-hosting-demo-dev-ecs-cluster. - (Optional) Set Cpu and Memory according to your needs. We’ll go with the default here.
- Set Execution Role Arn to the ecs task execution role created via pulumi. This can be found and copied from AWS console.
- Set VPC ID to the one used in the pulumi stack.
- (Optional but recommended) Toggle on cloudwatch logs.
- Set subnet and security group in the Network Configuration. We’ll copy the IDs of the fargate security group created via pulumi and any one private subnet of the vpc. This step is important because in the ec2 instance running the server we’ve only added inbound for the said security group*. The format to follow:
{subnets=[<subnet-id>],securityGroups=[<sg-id>],assignPublicIp=DISABLED}
- Click Save
Perhaps this step can be automated similar to how we’ll automate build and deployment in the next section but since it’s fairly simple to do so in the UI and isn’t expected to change very often, I haven’t really looked into it.
*My understanding of networks is very bleak so this may be innaccurate or outright nonsense. It seems that the inbound rules based on security group only work when the communication between services occurs internally within the VPC and not through the internet. At the same time however we need internet access to fetch the image from ECR. So the kind of subnet that works is associated with a route table that contains in its routes a public nat gateway but no internet gateway.
Deploy in remote server
To run the flow in Fargate, we have to build a docker image of our workflow and upload to ECR. We also have to let the Prefect server know where to get this image from and which work pool to associate it with. But since the server is not accessible publicly, we need a service within our VPC to do this. This can be achieved via Codepipeline or a Fargate task. We’ll be using the latter and write a Github Action to trigger it. The task defintion for this Fargate task was already created in the pulumi project.
Let’s update the deploy function in our flow’s main.py file as explained in the docs
if __name__ == "__main__":
    name = "mean_and_median"
    mean_and_median.deploy(
        name=name,
        work_pool_name=name,
        image=DeploymentImage(
            name=os.environ.get("AWS_ECR_REPOSITORY"),
            tag=f"{name}-latest",
            dockerfile="./Dockerfile",
        ),
        push=False,
        build=False,
        cron="*/5 * * * *",  # Every 5 mins
    )
Notice we’ve disabled push and build because this is something we’re handling in the github action ourselves. In the root directory, let’s create Dockerfile as follows
FROM python:3.12-alpine

WORKDIR /app

COPY . .

RUN pip install --no-cache-dir -r requirements.txt

CMD ["python", "main.py"]
And a .dockerignore file with the contents
venv
__pycache__
.vscode
infrastructure
Now we can write the github action workflow. I have omitted its code here but it can be found in the repository. Note that the step to configure aws credentials doesn’t include any reference to access and secret keys as I’ve used OIDC instead. I have also set up an Environment in the repository named dev which is referred in the action. So the variables will be read from this environment. These are the variables we must add
- AWS_ECR_REPOSITORY - Name of the ECR repo
- AWS_ECS_CLUSTER - Name of the cluster
- AWS_ECS_NETWORK_CONFIG - The same values as we added in the work pool config will work. The format to follow
awsvpcConfiguration={subnets=[<subnet-id>],securityGroups=[<sg-id>],assignPublicIp=DISABLED}
- AWS_ECS_TASK_DEF - Name of the deployment task definition
- AWS_ROLE - ARN of the role created with OIDC setup
You may choose to store the variables in repository variables if you like. It will not be a problem unless you have to manage multiple environments like dev and prod.
Test
Finally we’re done! Push a commit to main to trigger the workflow. Notice when the deploy job starts, a new Fargate task in the cluster will be initialized which will create a deployment in the Prefect server. Since we had added a schedule in our deploy function, the flow will be trigerred automatically every 5 mins and you can observe it in the server UI and in the ECS cluster.
It may also be worth noting that in the github action, the deploy job is not required to run everytime a new build is created unless the args to the deploy function change. This is because it refers to the mean_and_median-latest image which is a tag assigned to the newest image during build. So this is something that can be optimized.
Phew! This turned out to be a lot longer than I thought because the set up is quite complex. I hope you found it useful. If you have any questions or find a mistake or a better way to accomplish some of the steps here, feel free to connect.